Pages

Showing posts with label diy. Show all posts

MAKING OLD SHOES SHINE : THE BLINGY VERSION

It's the official party season. (Which for me is more of a work season; no time for parties.) All display windows ad billboards fill up with black and gold and red and glittery sparkly things for the season. Well, it's Christmas all year round in many ways for me (not just the lights here and there) as the amount of sparkly stuff  I nowadays have to drape myself in is, well, a lot. For all the obvious reasons.

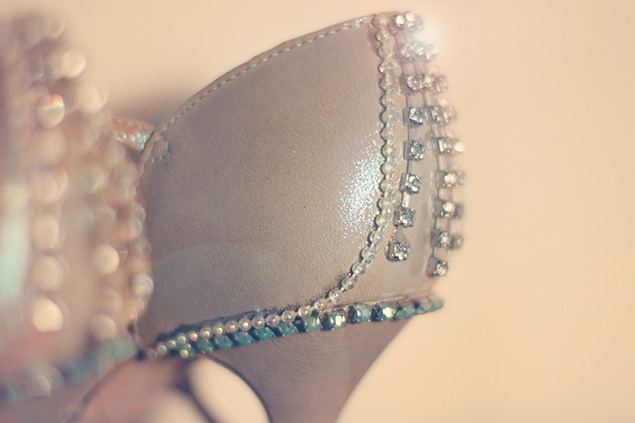
I was blinging up an old pair of shoes for a show, but, this is of course something you can do without having to strut with them on stage in. You may remember my tip from some years back about attaching jewellery to a pair of heels? Another quick and easy way to bling a pair of shoes up is to use some rhinestones and glue and TA-DA, instant party shoes!

I normally use a fabric glue that is still elastic when it hardens but as the shoes I decided to pimp up are made of (faux) patent leather I used hot glue and pre-glued rhinestones instead. Because theses are for a themed act I put the bling on to resemble daisies. (I also made a glitter surface on the sole but we'll get back to that in another post.)


Be sure to clean the shoes before you start. The smaller rhinestones were pre-glued and came in lines (from Tiger)  which made this an easy task. Otherwise I use a chrystal pen or a pair of tweezers to grab and place the pieces.  Remember to be quick if you work with hot glue as it dries instantly - for bigger stones it's easy but for smaller ones that you might want to add in a formation (a line like here) I'd suggest another kind of glue that takes a little longer to dry. Haberdashery stores also sell rhinestones on a string, which would work nicely for this - the price per meter is high but you will not need so much for a pair of heels so it's doable.


And then it's just on with the heels and off to shine and sparkle!
(and yes I know, my working space is a mess as I, in my usual manner, am working on too many things at once...)

SMALL RED ADDITIONS


Dag's room. The one we've been working on only for about 14 months or so. And with working I mean not setting my foot in there apart from hanging up curtains there once in March, doing some occasional messy sewing and storing all my show-suitcases in. So he's still sleeping in our bedroom and playing all over the living room. In fact the whole flat has looked like shit not been too nice looking the last year. I'm too busy with everything and all the free time we spend at the farm. But as autumn always is my kind of new year I have actually done something about it; I've been organising my paper work and such to get it out of that room end elsewhere and started moving some of Dags things into the old study! Step by step, toddler steps.


We got him some basic wood furniture from ikea and pimped them up with some red. I still had some red spray paint left from when painting the heels on my boots red last winter, and coated the legs on the stool (that will work as a night stand) and the knobs on the chest with it. Quick and very painless!


The cat lamp has also finally found a real home. (And soon someone will even live in there!)


2x REVAMPED


You  may remember the long pinafore skirt I have? A friend of mine got the same one but felt it did not fit her so she passed it along to me -ssometimes it's good with doubles of certain pieces of easy, everyday clothing. As the material on the skirt got rather floppy after the first wash already I thought I might as well turn the other one into a shorter skirt that'd go well with boots now in spring (and for autumn).

Snip snap with the scissors and a few rounds with the sewing machine and there it was!
And  I - of course -  made a pair of pockets for the skirt out of the cut-off hem.
If you cut a hem shorter (or the sleeves of an item)  it's smart to use the left overs for something to go along with the updated piece, especially if the fabric is patterned. If not pockets then you can make a hair band or scarf out of it.

The blouse is the basic top I revamped by sewing a lace appliqué on.

Dag chose the bangles for me and came and put them on.


THE RED BOOTS THAT ARE EVEN MORE RED NOW


You may recall me mentioning red suede lace up boots on several occasions trough the years? The kind of shoes I liked the idea of but didn't necessarily want to own, as I didn't really wear boots for many years. But due to practical reasons and shorter hems of mine I've been digging out my old boots from their hideabouts during the year and some time ago decided was it was time to start the search for the red ones, if such were available. Well of course, the internet delivered after some time and now I can tick that off my list!

But, the heels on the boots were beige and for me heels in a different color than the shoe only works in certain cases, and this was not one of those cases. So I did not really come around wearing the shoes -the whole point was that they had to be red all over.  The next step was then to try and paint them! I once coloured a pair or rubber heels (and soles) with a random textile paint I had at home and it stayed on super well for years so I was rather positive about perhaps getting something to stay on these too, although this was riskier as the heels are plastic which is not the same since it won't absorb the paint. Heels take a lot of hits and most likely any added color might rub off easily.  But worth a try still -

Went over to the hardware store and decided on red spray paint (and a brown-red primer), hoping the difference in shades would not turn too bad.

Put some masking tape to cover the actual shoe and gave the heels a couple of round with primer and then paint. I filled in uncoloured areas close to the seam with a red marker  - I coloured a pair of satin dance shoes like that once, with a marker, and it turned out super - but thats for another post.


And it did not turn out that bad! Well, quite good actually. After a few days in action the color is still on, so so far so good...


PIMP MY JACKET


 I fixed up an old winter jacket of mine!

Or, old and old, it has indeed been waiting in my closet for quite some years, but I never really properly used it . It's is plain black duffel I got on sale with the intention to fix up with a faux fur trim as I couldn't find such a jacket anywhere at the time. I also got it a little too big in order to fit an extra lining; it was when we had a second very cold winter and I wanted it to be super warm. Well, I did do all of that, but I can tell you that extra fleece lining of mine didn't turn out that well as I in my usual matter just cut a little like this and that trying my luck... the arms got all twisted and weird. And getting the big shawl-like collar I wanted to stay in place around the original collar was harder than I thought. So I used it perhaps once or twice and then hid it out of sight and out of mind trying not to think of all the work and money my little idea had cost me.

The next winter all stores were of course full of jackets with furry collars and cuffs.

But, I decided to fix it up now instead of it collecting dust in the closet!  With a thinner, easier fabric instead than the thick fluffy fur I used the last time. And in leopard, which is better anyway. Aaand forget about any extra lingins, jeez, I have big knits to do the trick. (And I think the super-cold is over for this winter now -fingers crossed).

Adding cuffs to clothing is pretty easy. Just measure the sleeve hole and add a cm or two for the seam. I want a lot of warming soft cuff on the inside of my sleeve too, so I make it rather long and then fold it over the sleeve. I fold it twice, so that it is double in the front. I sew the cuff in place by hand.

The collar is a little trickier, but this time around I made it smaller than I had tried on the first round, and did it with a little more preparations. I traced the original collar and then sew my pieces together to fit like a pocket or bag around it. I sew it in place with tiny stitches by hand.


Done!

The material was a bout ten euros and it took me an hour or so to get the work done. So it sort of feels like I got a new winter jacket almost for free, as I can pretend that 2010-thing never happened.


LACE


I feel that I most of the lately time have been running around in my different versions of my "beatnik look" (sans the belly of course, but plus a lot of layers on top of that) - black is easy - as my days mostly consists of hanging out with Dag in-and outdoors, working when he's napping and running to rehearsals and to the gym after that. But otherwise when it's not the all black- or hobo layers look, many of my blouses and shirts have still been put aside due to motherhood, until a time when there will be less goo all over. So I've been wearing lots of basic cotton tops instead. Which sometimes feels a bit blah and too neutral. But they can be pimped up a little though, to better suit some of the other items I have, like the one I put cuffs and a collar on. And this one here! It's a basic organic cotton long sleeve tee, that I sew a lace appliqué on.


Probably best done by hand if you are patient enough - not me; I used a loose zig zag seam to fasten it. When the stitches are somewhat loose I'll be able to re-attach it to some other garment when the top gets too floppy. And to be washed by hand, or perhaps on the gentle program in a lingerie bag.


Fabric- and haberdashery stores sometime sell small lots of lace ribbons and appliqués at a nice price. I've tried to cut out my own from a lace fabric too. That gave me a headache. If you can't find any suitable lace there is of course always the trustworthy internet to rely on too.
I stocked up so there will be more lace on more stuff to come...


A WIRE HANGER IN THE KITCHEN


I never seemed to find a suitable hanger or stand for the kitchen paper towels so I made one out of an old wire hanger that hangs from a small nail-turned-hook. I obviously had to cut away a couple of cm n the middle to be able to fit the roll, but just a little bit though - too big a gap would make the frame too weak to carry the paper roll when in use.

TIGRESS SHOES


These are my favourite dance shoes for the moment, which I use for performing and teaching. (Or, for one performance, as most number have their own shoes, at least in cases like this, with a strong pattern or color shame). They originally came as zebra patterned shoes but I needed tiger stripes so I added the orange stripes myself by painting on stripes of glue (Jewel-it glue, which works best for these kinds of things) and them pour heaps of glitter on, two rounds, and one final round with painting a thin layer of Jewel-it on with a brush. (That works on big surfaces too, like glittering a whole shoe,  and it lasts well, but we can look into that some other time.)

Also, a little hint; if you have a hard time making it the whole night in heels, try it with a pair of dancing shoes. They are softer and flexible which makes them easy to move in (well yes, as they are indeed dancing shoes) and thus also easier to wear for a long time. I can wear a pair of dancing heels trough a whole day of teaching without any particular feet ache! (But, this trick mostly works for indoor parties, daning at clubs etc, as the sole soft and won'tt take bad weather). Which leads us to another little tip at the end - remember to stretch your feet (and calves) afterwards if you have had your heels on a lot and moved around! It is kind of an awkward muscle workout for your feet and calves to be placed in heels for along time so stretching them out afterwards helps you avoid aching sad feet the day after.

These dance shoes are from Light in The Box, where you can choose the shape of heel yourself!
(When it comes to sizing I am between sizes and I went for the smaller, which was the right choice.)

HOUNDSTOOTH AND STRIPES


I was planning to sew myself a checked warm wool skirt for winter. Or, for autumn already actually, but it wasn't happening and the days getting colder so when I happened to peek in a little on the Tara Starlet sale during Christmas I realised I'd get away a lot easier if I just bought one instead.  So this blue-and black houndstooth skirt came home to me a couple of days later (I have to say, Tara Starlet's deliveries are always super fast! This came in less than a week even though ordered during the holidays!)

The blouse is a basic high street one that I sew cuffs and a collar on.

MEIRA CAFE HIENO WINTER EDITION DIY : THE PRETTY WINTER SKIRT & TOTE BAG DELUXE FOR GIFTS


As a blogger part of the Indiedays Inpsiration-network I was selected to participate in a DIY-project campaign. The task was to make use of Finnish Coffee brand Meira's Cafe Hieno Winter Edition fabric. The print is designed by graphic designer and illustrator Georgi Eremenko, inspired by cold winter mornings and warm kitchens. And hot cups of coffee, of course.

The campaign is a collaboration between Indiedays and Meira's Cafe Hieno.

So, I was sent over the fabric for my projects and some matching coffee to help me along.
Btw did you know Finns drink most coffee in the world per year per capita? Eddi has more coffee than water I think. I am a more moderate consumer :)

My first thought was to sew a circle skirt. Well, as you know, my first thought is always to make a circle skirt when I come across cute patterned fabrics. All forms of circle skirts (full, half, three quarter) hang so beautifully. Pretty much any fabric works well for a full skirt, both fashion and interior, thick and thin. In fact I think heavier fabrics work very well;  if the texture is sturdy the skirt will stay pretty big with an "ooompf" also without a petticoat underneath.

Circle skirts are very easy to make as long as you know the basics. In the end there is not so much sewing to do. What you basically need to know is the measurements; the radius of your waist circle and the radius of the whole circle (the length of your skirt plus your waist radius). It's that good old school math making itself useful; the radius is the circumference divided by Pi divided by two. The internet has a lot of great tutorials and well explained how-to's on circle skirts out there already, so for measuring and cutting you can check these two out for example: circle skirt math & the circle skirt how-to.

(You can click the images for a bigger view)
I could have cut this skirt out as one big circle (a basic 140cm wide fabric like this is just enough for my measurements to get it as long as I like; to hit the knee) and made a slit for the zipper in the back but I wanted the print to hang in the right way both front and back (cut as one circle it would hang upside down on the other side), so I made my skirt out of two half circles instead, which actually makes it easier in my opinion; placing the zipper in the seam on the side.

As with all things made by hand preparation is king (sadly I must say, as I just like to dig in and get on it right away), so measure and cut properly and be nice to yourself in advance: zig zag all the edges of your pieces -  in this case, two halves of a skirt and one waistband - and iron the hems as you go along You will thank yourself a few minutes later then.

It would be optimal if you could allow your skirt to hang over night, as it is a full circle the grains that go across the fabric will stretch out (the bias stretch). So I let my skirt wait before sewing the waist band and hemming it. (You can read more abut the bias of a fabric and how it falls here.)

I fold the waist band over both sides of the waist line on my skirt. I put a hook in (by hand) to fasten the waistband. I hem my skirts with a rolled hem line, no pinning needed, just roll it up a bit and sew along. 

Done!


Since the print on this fabric is in white and gold I was thinking the skirt would turn into something of a party skirt for the Christmas season, so I didn't put in pockets. But now that it is finished I see it can still be styled for everyday wear as well as fancy-smanchy. So I might add a little pocket somewhere after all :)

But, I still had fabric over which meant I could try out another little idea I had; making tote bags.

Well, as with skirts I have lots of tote bags as well, and you wouldn't think a canvas tote bag that special. But  you can never really have enough of them. I keep one folded in my purse for grocery shopping. And the thing is a tote out of pretty fabric is a great way to wrap a gift as well - you may remember me liking to pack my gifts in a useful way -less trash more joy - in jars and boxes. And why not in totes too! So now that the gifting season is coming up, why not make a little stash of bags to use for later?

If a circle skirt is easy to make a tote is pretty much idiot proof, just folding and sewing a rectangle together. If it bugs you that the pattern will be upside down on one side just cut the rectangle off in the middle, flip one side the other way around and sew the bottom together.

And this will be the deluxe version of a tote bag, which means it will be all clean and neat on the inside. To deluxe it up, so that is not only more neat but more durable, put your seams on the printed side of the fabric first -you can sew close to the edges with quite little seam allowance- then fold inside out and sew seams in the inside.
Ta-da, clean and neat on the inside!
Then fold the opening over twice and sew around the edge.

I find the easiest way to make handles is to sew the seam on the inner side and turn the handle inside out with the help of a safety pin. Iron the handles flat and smooth before sewing them to the bag. Sew the handles properly on with a square and a cross to be able to carry your books, groceries and whatever stuff you like to carry around.

To wrap a gift in a tote bag, just tie a ribbon around the top of the bag into a big bow (you can add the handles to the bow  too), or wrap it as you would wrap a gift in paper as well - it will be a little bit more bulky though. Fold the handles in the bag first. Tie the gift together with a matching or contrasting ribbon.

You can of course use this all year round, not just for Christmas. Something freshly baked packed in a cute bag is a lovey present, or,  in this case:  a pack of coffee in a matching tote makes a great coming-over gift!

You can see the rest of the DIY projects, which are coming up one by one during the following weeks, on Indieday's Meira campaign page, where you also can vote for your favourite DIY. By voting (trough Facebook likes) you also participate in a competition to win a Meira goodie bag!

BUTTONS IN THE BACK AND AN IKEA SKIRT


 I bought a new summer top with a scalloped hem that  buttons down the back. More tops should to that; come wiht buttons in the back.


I wore it with a new carnival skirt that I made the other day out of a leftover piece of fabric they had in the sale box over at ikea. Sturdy interior fabrics make great circle skirts! Or, as in this case, a 3/4-circle skirt.

I of course had to make the skirt with pockets.

Because you know, as I say,  pockets make any garment a little more perfect and life a little easier.

SHOES & EARRINGS


 An easy party-shoe DIY is to bling up your heels with some jewelry.

 
I have been sparkling up a pair of dance shoes for an upcoming burlesque number, and as always with burlesque more is more is more -there can never be too much bling and sparkle- so also in this case. Instead of gluing hundreds of crystals one by one I cut apart a couple of earrings and a bracelet. And added some swarowskis and pearls string too, once I was at it.  (You may recall me saying I don't like crafting all that much as it is messy and the result not always perfect but sometimes I just don't have a choice. And glittery stuff like this can almost be fun.)


For a more subtle result, that does not look like a unicorn arrived and puked up a bucket of glitter or so, you can get a new fancy smanshy shoe by just attaching one earring, or parts of it, on the side, heel or toe. The best is to choose a light piece that looks more blingy than it is. I got some earrlings on sale from H&M. I use a special embellishment glue called Jewel It which is still elastic after it has hardened and also washable-proof.

THE SIENCE OF A POM POM AND THE PAIN OF CRAFTING


As I only had about three hundred other things to do I decided to make us some pom poms the other night, I had had some yarn waiting for this moment for some time. (How annoyig of a person does that not sound like? "I have lots of things to do, but I feel like making pom poms! Tralalala!")

But as it was propably twenty five years ago since I last made such I needed to consult google before getting started. If you suddenly get a pom-pom urge, here's how to:


You need to cut two circles with holes in the middle (like a donut) out of cardboard (or, I even saw they had ready made plastic pom pom rings on the hobby department in the big store but hey, come on...) - I cut up an old cat food box. I made a couple of sizes.

Then you spin your thread, you can use many at once, round both cardboard donuts, cut the threads up in between the donuts, put a string in and tie firmly before removing the cardboard. Zippa-dee-doodah, ze pom pom is ready!

As soon as I started cutting the cardboard I remember how much I actually hate crafting. Or not hate, but how much it frustrates me. It's messy, and if the result does not look pro-made, which it seldom does as I don't craft often enough, I get pissed off. I thought spinning the thread around and around would perhaps be meditative or so (as much meditative something can get with a baby, two very intense cats and two older boys with their computer games at home can get) but it was in fact not. And nowhere on the world wide consulting web did anyone say how long you should cut your threads or what would be the best way to spin them in order not to get all messed and knotted up or take forever to spin. Really, was this as annoyig when I was five years old?


I noticed that buy cutting away part of the circle spinning was faster and I was able to spin'em straight from the roll clew. But then the pom poms went bazookas when cut up and turned out all miffo as they wouldn't stay together long enough for me to tie them tight.

But shame on the ones with hundreds (alright, tens)  of meters of yarn to go who gives up! I went trough the pain of cutting some more cardboard and realized the best way was just to cut the donut open, not remove a slice, and tilt the pieces a bit so the ring could be fastened to a whole circle again for the cutting up phase. Pompom science here. Perhaps that's the way we did our pompelipoms when I was a kid too; maybe this is the way to go, but ze interwebz failed to tell me. Well now you now.

Then they started turning out al righ and fastt: pom poms, yeah!

When a lot of time had passed by I had a hellofalotta pompoms and it looked like a kindergarten class on a sugar rush had been all over the place.

But yeah, all the pom poms. They'd look good in a christmas tree for example, hanging one by one. Or as a garland. But I wanted to make a wreath out of mine. I know there are ready-made different wreath-bases to buy, but I would never come up with the idea to actually go somewhere to buy one. Instead I had to go the experimenting way, which obviously would not turn out as fancy as would I have had one of those making-life-easier-ready-made-base ones. I fastened mine on a ring cut out of cardboard, or thick paper actually; the only thing big and thick enough I could find after a bit of annoying searching time was a piece from a goodie bag I'd received.

I tied my poms to the ring I'd cut out, then glued a second paper ring onto that, and finished off with a bit of mexican oilcloth to make the wreath a bit sturdier. And to look nice on the backside. Which no one of course will ever see.


And ta-fucking-da, there it is on the door! Would make any mother-of-the-eight-year old who made it proud. Where that the case. I can say Dag made it. A total prodigy.

So much text about fluffy yarn balls. No but really, it turned out rather cute. And who doesn't love pom poms after all? Plus believe it or not, afterwards I even made some more of those as it was going fast and easy it almost was terapeutic rollig all that yarn after all.

Now I just need to invite some people over to admire that wreath while waiting for me to open the door (must linger a bit hehe); we live on the top floor with only two neighbors. So no one will really see it. But thank god for the internet, right?!